13 March 2011

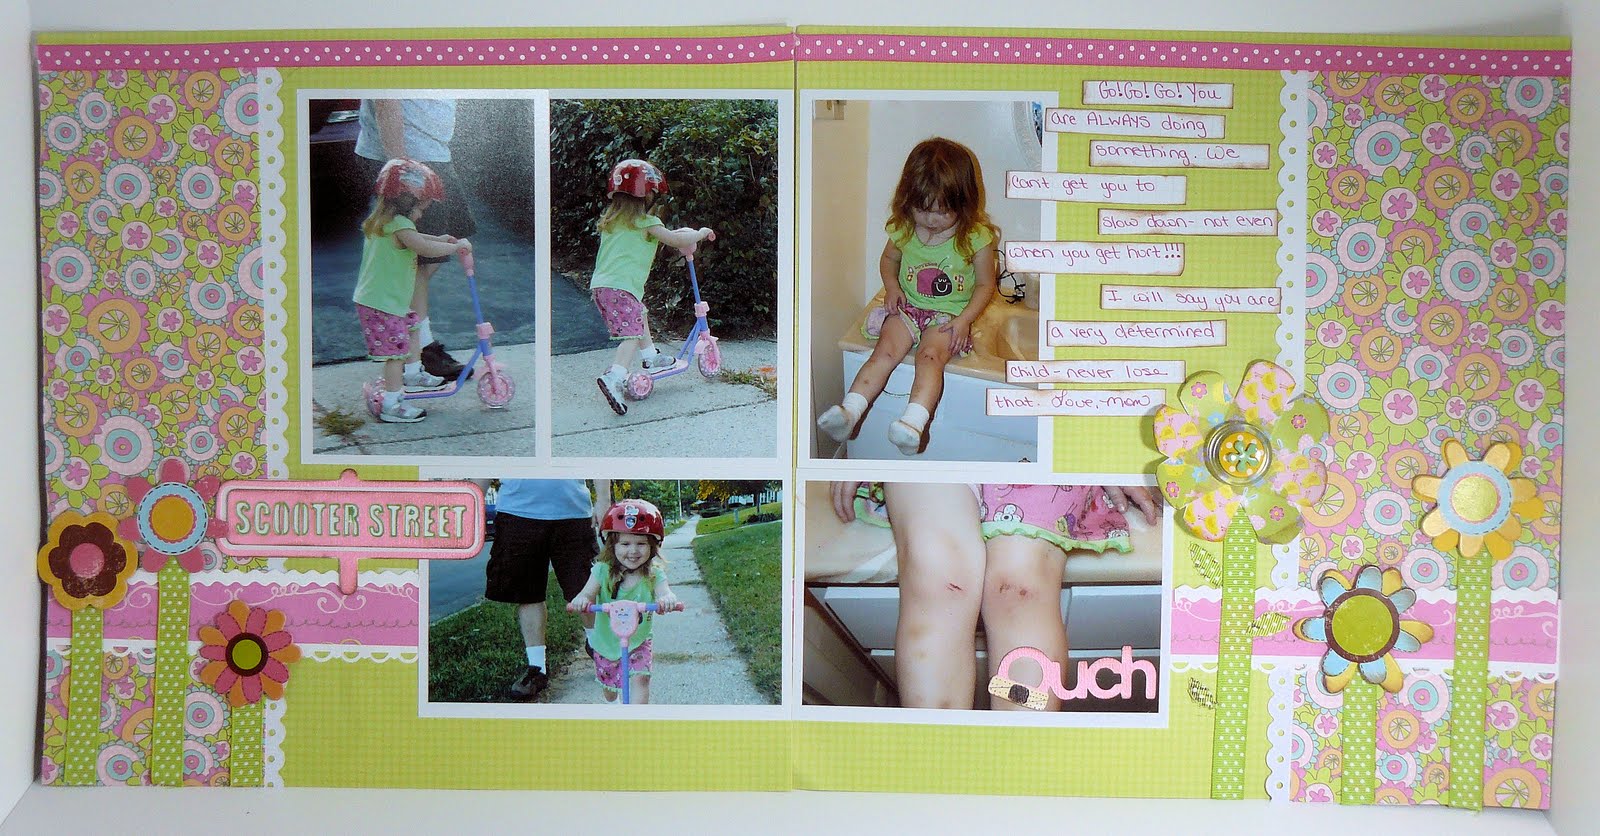
You all know that I have a girl that is the star of my layouts. Well this month I was given the amazing choice of Cartridges to work with from Scrapbookpal.com and I choose Nates ABC's. No gasping! This is a very versatile cart for toddlers-boys and girls. Caitlyn is NOT a girly girl, she is not very into princesses, dolls etc (stereotypical girly things) She is more into dirt, dump trucks, tools, and pirates, but in her own way. So I knew this cartridge would serve me well! Here is the layout that I created, now does it look boyish at all???

Let's get started!
Ingredients you will need:
Expression
12X12 mat
Nates ABC's
Tombow brown marker
various cardstock and pattern paper
mini glue dots
zig glue pen
ATG
chestnut roan ink
Tim Holtz scissors
buttons
brads
ribbon
chipboard flowers
band aids

1. Using the Expression (or baby bug) the appropriate mat, Nate's ABC's cut the OUCH (page 66 phrase and phrase shift) out of pink and tan paper at 1 inch. Adhere together. Dot band aid with Tombow brown marker and color in middle with wide tip.

2. Using same pink paper and white card stock cut SCOOTER STREET at 2 inches, page 68 font2 and font2 shadow. Adhere together with zig chisel pen, outline letters in green, ink edges.
3. Cut various pattern papers to fit this sketch. Adhere with ATG tape.

4. Select and adhere green dotted ribbon, hand cut leaves, and chipboard flowers to layout as shown.

5. To make the band aid flower, select four various band aids (mine were super cute printed ones) and form shape, making sure the middles always overlap. Now you can either leave backing on and hold together with a brad OR remove the band aid backings, arrange and adhere to white card stock, and cut out (gives it more stability). I then adhere a flower brad through the holes of a polka dotted yellow button, and using mini glue dots placed that onto of a clear button to make my center.


Up close of the band aid flower. I bought my band aids in Joann's dollar aisleThe dimension it has, when the petals are rolled up.
Close up of my title even with the mistake!


I had fun with this layout so I hope you now see how Nate's ABC's can be for any gender!

11 March 2011

Trash 2 Treasure (Counterfeit Layout 3)

Please SCROLL DOWN FOR MY FROSTED DESIGNS COLOR CHALLENGE!!!!

These pictures are from last year. C has changed SO MUCH in this small amount of time! She does not even look like the same child! J made her a house out of the office chair box complete with three windows, a door with a handle, a chandelier (homemade LED frosted holder), a light box that showed all the colors when she pressed buttons, and of course a blank canvas to alter! This house is still standing and is covered in various paint, stickers, foam pieces, crayons, markers, pencils, and more stickers! It is a masterpiece of course! LOL! Everything came from my kit YAY!
Um yeah the purple piece is Caitlyns addition! OOPS! LOL!
Close up of the faux pleated border I attempted using burlap scraps!
Close up of the flower. I just randomly cut some circles, and pop dotted them up for some dimension. Everything has ink on it of course. I hope you like it!

Frosted Designs COLOR CHALLENGE


KATHYJO DO NOT LOOK!


Good Friday morning! I hope this finds you doing well! This week at Frosted Designs the challenge was to use a picture and a specific color theme. I was so frustrated when I saw it, simply because I don't own or use much purple EVER. I only owned THREE sheets of cardstock/paper in purple and TWO of those were scraps given to me. I am so sad LOL! BUT I think I pulled it off. I sure hope you like it. I took a 3 inch embroidery hoop that my awesome friend Jamie sent me and did it up for a swap I am in right now.


Can you tell I am having fun with my props? I used Lacy Labels to cut the circles every quarter inch from 3 inches to 1.5 inches. I used foam dots to puff everything up and it is so dimensional in real life. I just realized that one of the purple pearls fell off next to the K, I have replaced it I promise! I also designed my own watermark earlier this week and I am so proud of me LOL! I hope to see you over at FROSTED DESIGNS!

Now who is up for this challenge? Head on over to Frosted Designs to find out more and to play along for a great prize from Amercian Crafts!

08 March 2011

Sowing Seeds of Silliness (Counterfeit page two)

I am so excited to share this one with you! I am NOT the kind of scrapper that can cut ANYTHING straight even with a paper trimmer! Really I stink at it so I challenged myself to use this sketch from Allison Davis that utilized tons of straight lines, tiny cuts, and alignment. I think I did OK! Almost ALL of what I used came from my counterfeit kit except the red letters in the title, the scrap of green card stock that I used to back the apple lace paper and the hemp that I used to tie in the buttons. Yes they are all now in my kit! I did lots of faux stitching since I cannot sew, inking, coloring, and even some stamping and embossing! I also used three sheets of my FAVORITE paper (I cut it there are you happy? LOL!) So don't mind me while I toot my own horn GO ME! LOL! Tell me what you think!

The whole layout, based in my precious and hard to find locally Bo Bunny double dot paper!
The apple lace card stock that I made into a border, backed with DCWV green card stock, inked up, added glazed seeds, faux stitching and green glitter leaves.
The awesome title that my hubby came up with! GO JON! Also the backing is from the stamps that I used, the back of those, then I made it into a ticket shape (love them!) with my corner chomper.
A sharpened image of the journal block and the embossed stamped apples I did for the visual triangle. I had a lot of fun with this one. What do you think?

DIY Woodgrain fabric/paper


Counterfeit Kit Challenge issued a tutorial on how to make the Studio Calico Wood grain fab rip. I tried something a little different. I am trying to learn Paint Shot Pro X2, well what it can do besides crop and adjust photos! I found an image online of two wood grains that I liked and entered them into my program. I adjusted lighting, saturation, hue and edges. These are what was produced. One is on plain Kraft paper and the other is on printable canvas paper that someone sent me a while back (Thanks Tara!). What do you think? I hope to cut some letters out of them to go with the fall layouts I am planning!

07 March 2011

Tulle flowers first try(Counterfeit Challenge)

I tried to make some puffy tulle flowers, using the Tim Holtz Tattered floral die that I received as a gift last week. They came out OK. I think I would like them more if they were the twisted petal kind like another wonderful lady posted in the challenge. Here they are, remember it is my first try!

Blog Candy winner!

Good morning. I hope you had a fantastic time hopping with us this weekend! I loved all the projects and all of your comments are super sweet! Thank you!

Welcome to all my new followers, I hope you enjoy my creations. A little about me: I am a OIF Veteran turned SAHM to a very sassy and feisty three year old. She is my star in my layouts and keeps me super busy. I have been married to my wonderful supportive and sexy husband for six years now. We met in college through the ROTC program, where we both earned commissions into the officer corps of the Army, served our four years and decided to continue our lives outside of the military. We are originally "southerners" but now we are transplanted up "north". I love to create, it helps me de stress and enjoy something for me.

Enough about me and my family, you are here for the winner right?????


Are you sure?????


Well thanks to random.org MELANIE MASON you are the winner! Please email me your mailing address to wkucmb at gmail dot com and I will get this out later on this week! Congrats. And again thank you all!

06 March 2011

March Counterfeit Kit Challenge Layout ONE

If you are here for the SPRING BLOG HOP please scroll down two posts!
I love how this turned out, the pictures already had the border on them (YAY!) and the paper has a sheen/shine to it, hard to capture in the picture! I also learned how to make and add my watermark ALL BY MYSELF!!!!!! YAY! OK I am super excited about that!!!! It is pretty simple but it is THERE! YAY! OK everything was from the kit. I also sorted all my pictures and have enough for two minis and about 12-15 layouts for this month, see I told you that is why I pulled so much!


March Counterfeit Kit Challenge

If you are here for the Spring blog hop please scroll down a post! There is blog candy!

Another month and Meridy and Bethany over at Counterfeit Kit Challenge choose a great kit to replicate. Studio Calico put together a main kit called INTO THE WOODS and FOUR add on kits. I was so overwhelmed that I decided to go with the general feel of the kit, but then it spiraled into a fall kit for me to work with. I pulled a great deal of paper since I have lots of Fall pictures to scrap and had those in mind when I pulled this kit today and yesterday. I reserve the right to add to and take away from this kit at any time LOL! Here we go!

This the main kit. Lots of woods, ledgers, oranges, greens and yellows.
My card stock and pattern paper I pulled. There are three sheets of various wood grain tones, and lots of fall colors. I also included crinkle card stock, Invisibles to alter, cork paper and lace cut card stock. Everything has been in my stash for at least a few months with the exception of the bottom right Kaisercraft, that has only lived with me for a week or so.
For my add on I choose several lined and ledger/number papers to make my own die cut paper from.
Since a lot of my papers were Imaginsce I added their stamps, a wood grain one, a script, banner and not pictured are several labels/journaling stamp sets.

This is my trim kit, almost all white with some orange and twine thrown in. I hope to ink/color them to match later on.

Journal and letter kit. I will be using Nates ABCs for several design team projects and letters, lots of kraft/brown letters and journal boxes. The white on the far left is sticky backed canvas which I hope to use to replicate the wood grain fabrips in the main kit.
And finally my embellishment/bling/alterable add on. I used lots of stars, butterflies, and bling. I also threw in some keys since I use them constantly, flat backed pearls in fall colors, and bottle caps to alter.

04 March 2011

Ready to hop? Spring time!

Good morning. I am participating in the blog hop sponsored by ScrappininNJ.
You should have arrived here from Kim's blog HERE.
The hop starts today and ends on the 6th. There are tons of projects to get you in the mood for spring, yes I know some of you are thinking I do not need any help there, but they are there if you need them. Oh and did I mention BLOG CANDY galore? Yeppers yeppers! Yummy!

So we were asked to do a spring/Easter theme. As some of you know my family including myself has been sick for going on two weeks now and everything is a mess here so I whipped up some super simple cards for this hop. I used the wonderful Cutting Cafe File Rain Rain Go away.
I thought they were pretty appropriate for this season! Can you tell I am loving my new props for photo shoots? LOL!


Oh I did mention blog candy huh? Well for the winner of my blog candy you must leave a comment on my blog with your favorite Spring activity. Easy Peasy. If you wish to become a follower that would be great, but not required. I have an extra set of Martha Stewart Heart and Flower clear stamps to give away (plus a few goodies from my stash).
Now your next stop on the super fun blog hop is Beatriz! Make sure to leave her some comment love too!