31 January 2011

Valentines Cards or Not?

Good morning. Can you BELIEVE tomorrow is the FIRST OF FEB?!?!?! WOW! Time is flying by! Soon it will be spring with all the pretty colors and allergies LOL! I hope you had a great weekend and stayed warm or cool depending on where you are. We had a busy weekend with the first gymnastics class for C and so much more.

OK down to business, today I am sharing three Valentine themed or NOT cards, two use awesome sets from Cutting Cafe and one is just punches and stamping. I hope you like them!


Fun with hearts set
I love this set. It has super fun hearts, this one will be for hubby, not too girlie, a little masculine I think.
Just stamping and punches. I used the Magical background stamp (Thank you Rhonda!) on the base and the red circles, then white ink and a heart stamp for the hearts.
Animal and Bug Love set
This set is super cute and can be used as Valentine or as I did to cheer someone up telling them to take their time getting better.

30 January 2011

Scrapbookpal VALENTINE blog hop!

If you are here for Frosted Designs please scroll down!

SCROLL DOWN FOR MY LAST PROJECT FOR JANUARY USING ROCK PRINCESS

Welcome! I sure hope you are staying warm this weekend! I am so excited to bring you some Valentine scrappy goodness thanks to the wonderful people at Scrapbookpal.com. I know I know you think I only "plug" them because I design for them but seriously who else on the Internet has FREE shipping on orders over 25???? AWESOME! And they are super fast so that is a plus! I love the selection they have and they are always staying competitive!

You should have arrived to my blog from the wonderful and sweet JAMIE. Isn't she super talented? I love her to pieces! If you are just arriving please start at the beginning HERE. After you finish cruising my creation you will head over to the amazing LEAH. Remember to comment on ALL the blogs and let Scrapbookpal.com know you enjoyed and finished the blog hop to be in the running for a FREE CARTRIDGE OF YOUR CHOICE! Good luck!

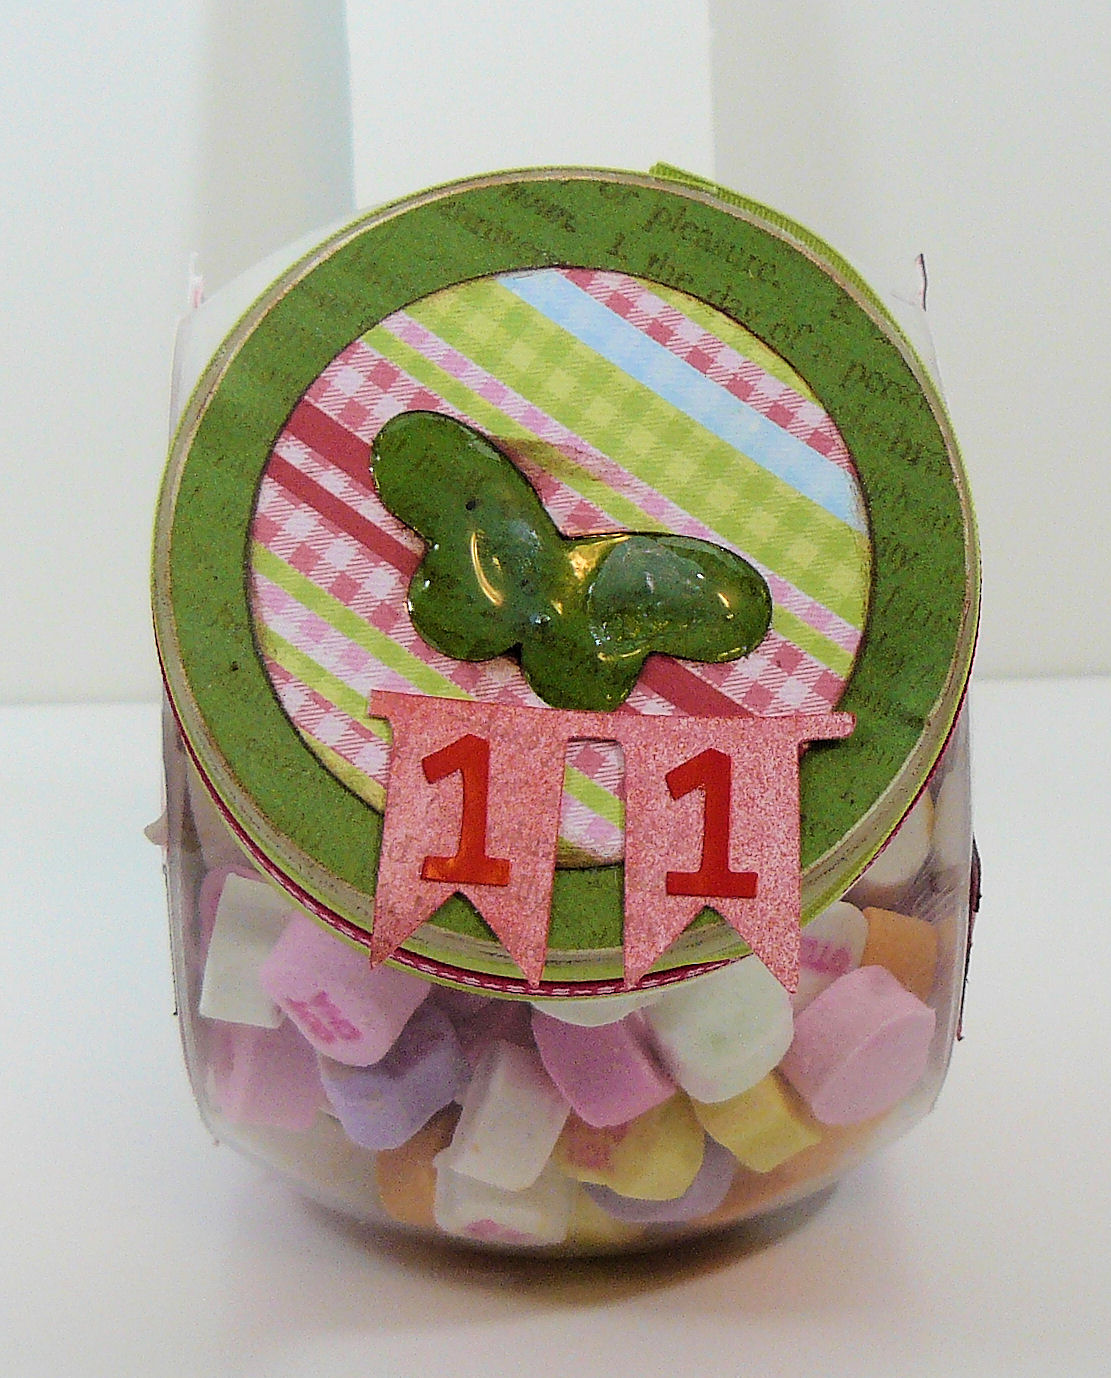
So with that said here is what I came up with for this weekend! This is what I started out with!

This is what I made! I love it. I used the new K&Company Sweet Nectar for the pattern paper. So let's get cooking!


To make this sweet little container you will need the following ingredients:

April Showers Cricut Cartridge
Cricut Expression
12X12 Mat
ATG and adhesive
Chestnut Roan ink
Barn Door Distress inker

Distress Inker Applicator
Glossy Accents
Ribbon
Letter and accent stickers
Candy

1. Using your 12X12 mat, Cricut Expression, and APRIL SHOWERS cut the banner shadow at 2.5 inches three times using white card stock.

2. Ink the banner using barn door distress ink pad and the applicator.

3. Ink the edges in chestnut roan.

4. Adhere letter and accent stickers to spell LOVE YOU

5. Cut patterned paper circles to fit on container, adhere with ATG tape.

6. Cut butterfly icon out, remove butterfly, adhere to top fill in negative space with glossy accents.

7. Using two leftover pieces of the banner attach "11" and adhere to top of container.

8. Decorate with ribbon, and fill with candy.

Super simple and fun to give. I hope you like it!

29 January 2011

Broken Heart? Scrapbookpal.com


I will admit that Rock Princess is totally not my style. I was a little worried when Scrapbook.pal sent it to me because of this. However, I am willing to try anything once (almost!) So here is my second shot, a card for a friend that is going through a tough time right now. I hope you like it and it helps her!

Ingredients:
Rock Princess
Cricut Expression
12X12 mat
Scotch ATG and 1/4 inch tape
Chestnut Roan ink
mini rhinestones
Kraft, pink, silver card stock
Heart patterned paper
rhinestones

Recipe:
1. Using Expression, Rock Princess, 12X12 mat cut the broken heart SHADOW at 3 inches on silver paper.
2. Cut broken heart in pink glitter paper, ink edges in chestnut roan ink.
3. Adhere two pieces together.
4. Cut phrase of broken heart (Heart Broken) at 1.75 inches out of pink glitter paper.
5. Using A2 size card, cut two small strips and one block from the pink heart paper and pink glitter paper, adhere to the front of the card.
6. Using foam tape adhere broken heart.
7. Accent with three mini rhinestones in top right corner.
8. Mat broken heart on silver paper, add photo corners from pink paper and sign.

28 January 2011

Are you up for a challenge?

This week at Frosted Designs we are featuring projects with a fun but challenging (at least for me) challenge. MONOCHROMATIC! You would THINK this one would be easier but I did not find that true. I made this sketch book for a dear friend using that theme. It is not TRUE monochromatic as the letters are different but I wanted to keep it simple and easy. I printed out tons of pagemap sketches, Allison Davis sections and left LOTS of room for her to add more if she wanted. I sure hope it was inspirational for her. I need to make me one LOL!

Make sure to come back in a few hours for the SCRAPBOOKPAL.com BLOG HOP!!! You could win a free cricut cartridge of your choice!

26 January 2011

Mail day for Caitlyn

The wonderful and generous ladies on the cricut MB blessed Caitlyn today with new crafting goodies. KathyJo sent her foamies, sizzlets, and a handmade scarf! Rita sent her some foam stamps and scissors that she loves. Here she is playing with some of her new toys, more ended up on the container, the envelope, the couch, the floor and we have used the scissors to make triangles and more! Thank you ladies!

25 January 2011

scrapbookpal.com BLOG HOP this weekend!


Want to win a FREE cartridge of your choice? Are you in the mood for VALENTINES DAY!? Well make sure to come back here on Friday morning OR start HERE first thing Friday morning (ok 7 am MT) but you get the idea and hop along with us. Leave comments on all the DT blogs (and why wouldn't you they are super awesome ladies!) and then one at the start and you will be in the running for a FREE CARTRIDGE! How much easier can we make it!?!?! See you then!!!!

23 January 2011

.59 Christmas box turned into this....


BEFORE! I had to go back today and get one more, well I got three different sizes for .01


So M's has all their Christmas items 90% off, I happened upon this box, just a red rectangle box with silver Happy Holidays and a bird on it. Well OF COURSE I can't have red in my blue/brown scraproom so here is what I came up with. I am pretty happy with it. The box was .59 and everything but the 3D barnstar is from my stash, but that star was only .25 WOOHOOO! What do you think?

I have it right in front of me with my glue dots, chestnut roan ink, Xyron X, corner rounder and sharpie marker. I love it what about you all?

21 January 2011

Christmas Day 2009


Who says that I have to scrap Christmas morning in traditional colors? Well I usually do but not this time, her jammies were pink so I broke out my awesome Echo Park Life is Good and away I went. I am a little unsure of this one but what do you all think?

Frosty Fun


Last night I challenged myself to use ONLY blue/white and brown and these two pieces of preprinted chipboard I have had forever it seems. This is what I came up with. These pictures are of C in 2009 on Christmas Day; she loved her sand/water table but we put snow in it first! She loved tasting and playing in it, she played until it was ALL melted! I even had to put gloves on her since she would not stop playing!


20 January 2011

Getting ready Play time

Welcome to my blog. I am so lucky and honored to be a guest designer today for Sketches in Thyme. I just love Kim and all her designers and I love that they allowed me this opportunity! Thanks hon! Kim gave me this awesome sketch to work with and I just knew that the pictures of Snowpocalypse last year would be perfect. This was after the FIRST snow fall, I think we ended up a total of 80 inches in like a week or two. Insane for this area! I made the circle using Winter Woodland, just minus the snowflake, then inked it up using spun sugar by Tim Holtz. The double scallop border was hand punched and inked also. Lots of ribbon, ink, bling, pearls, and glitter. I hope you like it!


19 January 2011

My poor baby


These pictures are from 2009 when little C was sick. It breaks my heart every single time she is sick. I went with rain clouds/rainy day to match how it makes me sad and reminds me to take a break. I hope you like it. I stamped rain drops on the kraft card stock with versamark and on my journal piece but it is hard to tell. The little cute duck and umbrella are Sassafrass felties I won from Lucky Girls Crafts. Paper is from my scrap drawer.

17 January 2011

Sending you sunshine.....

A great man and my former JROTC instructor in high school, one of the people I credit with putting me on the path I am today (along with 1SGT Thomlison RIP), is going through brain cancer right now. I have rallied my Cricut Card Fairies and my friends from high school to flood this awesome mans mailbox with reminders of why he needs to fight and how far his influence has reached. He needs to know that we care, and are fighting with him. Sorry I am still tearing up with this. Here is my card.

I used Beautiful Trees by Cutting Cafe and other stamps. The inside says "during your rainstorm" and then I wrote a paragraph.

I apologize for the bad lighting I want to get this in the mail first thing tomorrow morning. Please if you pray please say a prayer for Paul Gray and his family. Thanks.

15 January 2011

Yum Yum!

I love love love the new SKETCH SUPPORT site that Allison Davis and family have set up. She has an outstanding design team and a great talent for sketches. I love how they all START at one point and end up totally different. I love sketches and often use them as my starting point although they rarely look like the sketch in the end. I think that is how it is for everyone. I used the double page sketch she has posted this week to make this single layout.

I also have started to enjoy another site called THE KRAFT JOURNAL. This week the challenge was Kraft card stock (always the challenge) and flourishes. So I think this layout works perfect for that one. I almost ALWAYS have a Kraft card stock background, I find that it gives my books a sense of continuity and I love how it goes with everything, easy peasy for me.

I did however find that not only can I not cut a straight line but I am not very much better at curved ones and need to invest in a bendable ruler! What do you think?

14 January 2011

Paint-Frosted Designs


I am showcasing how a simple supply like paint can make a project pop. I needed a quick gift and this is what I made; it is a dollar wooden picture frame from Michael's. I painted it "pool blue" and edged in "Carmel/chestnut" paint. It is hard to tell but I also edged the flowers with paint. Add some bling, pearls, ribbon and a cute scrapping saying and there you go!

13 January 2011

Room Decor-Rock Princess-Scrapbookpal.com

Good morning! I hope you are doing well this week. Today I am here to share with you a cute room decor item I made for Caitlyn's friend. Her birthday was in December so this was perfect. Her room is in pink/green/butterflies so the ROCK PRINCESS cart that Scrapbookpal.com sent me to play with this month was PERFECT! Speaking of scrapbookpal.com have you checked them out FREE shipping (that is what I am talking about) on all orders (U.S.) over 25.00 and I promise they are SUPER fast and customer service is top notch!

Ingredients:
Rock Princess
Cricut
12X12 mat
White card stock
Kraft Card Stock
Pink scraps
Two patterned papers
rhinestone swirls
Bic Mark its or something similar
Chestnut roan ink
Gelly Roll pens
Stardust pens
Mini glue dots
Zig chisel tip
Cutterbee scissors
Tweezerbee tweezers
ATG tape/dispenser
Distressor
Ruler
Directions:
1. Using your cricut, mat, and Rock Princess cut butterfly 2 out of white card stock at 2.5 inches TWICE.
2. Using heart font cut EMILY'S ROOM at 1.5 inch in white card stock.
3. Using Kraft card stock cut the SHADOW of the butterfly2 twice and 2.5 inches and the letters SHADOW at 1.5 inches.
4. Adhere pieces together with Zig pen or ATG tape.
5. Using patterned paper cut the wings of the butterfly, adhere to white card stock.
6. Using pink scrap card stock cut the body of the butterfly and adhere to white card stock.
7. Color droplets on the butterfly wings with markers.
8. Outline in glitter pen.
9. Assemble sign on the distressed corner folder card stock.
10. Adhere with ATG tape; add rhinestone flourishes to butterflies, color hearts in font; adhere sticko shimmering dots.
11. ENJOY!

12 January 2011

Artist in Training

Very rarely does C like to get her hands dirty. These pictures are when she was almost 2 I think. She loves the IDEA of playdoh, painting and coloring but NOT the mess. She is so prissy that way but this is the same girl that will go out and play for hours in the sand/mud/snow! Silly girl, she sure does have her quirks!


11 January 2011

Tech Geek


C loves to talk on our phones will beg but as soon as you hand them over SILENCE! She will jabber away trying to get your attention but as soon as you hand it over there is NO getting her to talk. She has been this way since she was little. She loves gadgets, technology and buttons so grabbing my old and new phones to "talk" and play is a favorite past time of hers!

10 January 2011

Family Star

For some reason I am going through a fussy cutting phase, which is HIGHLY unlike me as I am not a patient person but as you can see I took lots of time to fussy cut all the stars and pop dot some of them. I love these colors and the border that I created!

09 January 2011

Do you want to see a Masterpiece?

I love this! I have been feeling cruddy lately (sickly and tired) and was napping. When I woke up Jon and Caitlyn had made this AWESOME card, she did almost all of it herself using my decorative scissors that I saved for her and her little sizzix sidekick. I LOVE IT! It truly made me smile and will reside on my desk front and center in a barn star photo clip forever!!!!


07 January 2011

Purging paper, for sale

So I am going to be purging my paper this weekend. I will have at least one if not two more large flat rate boxes FULL of various brands to include: My Minds Eye, American Crafts, DCWV, Me and my big ideas, cardstock, K&Company and many more. It will be a huge surprise but if you like my style you will probably like the box. I will be selling them for 30.00 plus shipping (which used to be 13.95). First come first serve, pay pal only! Let me know!

03 January 2011

2011 calendar


I have made two calendars this year thus far. This one is for someone special and I hope she likes it. I used the wonderful Cutting Cafe 2011 Calendar set. The other one was for me and I don't have pictures but it is the 8X8 DCWV Calendar kit. Super simple but I plan on taking pictures of C every day (same day) of the month so that I have a progression of the year. Does that make sense?