 These pictures were while we were bowling for the second time I think. The girls needed a lollipop break! I had to pull the background pattern paper from my stash but besides that i made most of the embellishments to include the fruit journal spot. I think this is layout 12.
31 May 2011
Lollipop girls
These pictures were while we were bowling for the second time I think. The girls needed a lollipop break! I had to pull the background pattern paper from my stash but besides that i made most of the embellishments to include the fruit journal spot. I think this is layout 12.
30 May 2011
Homemade Smash book-using March and May CKCB


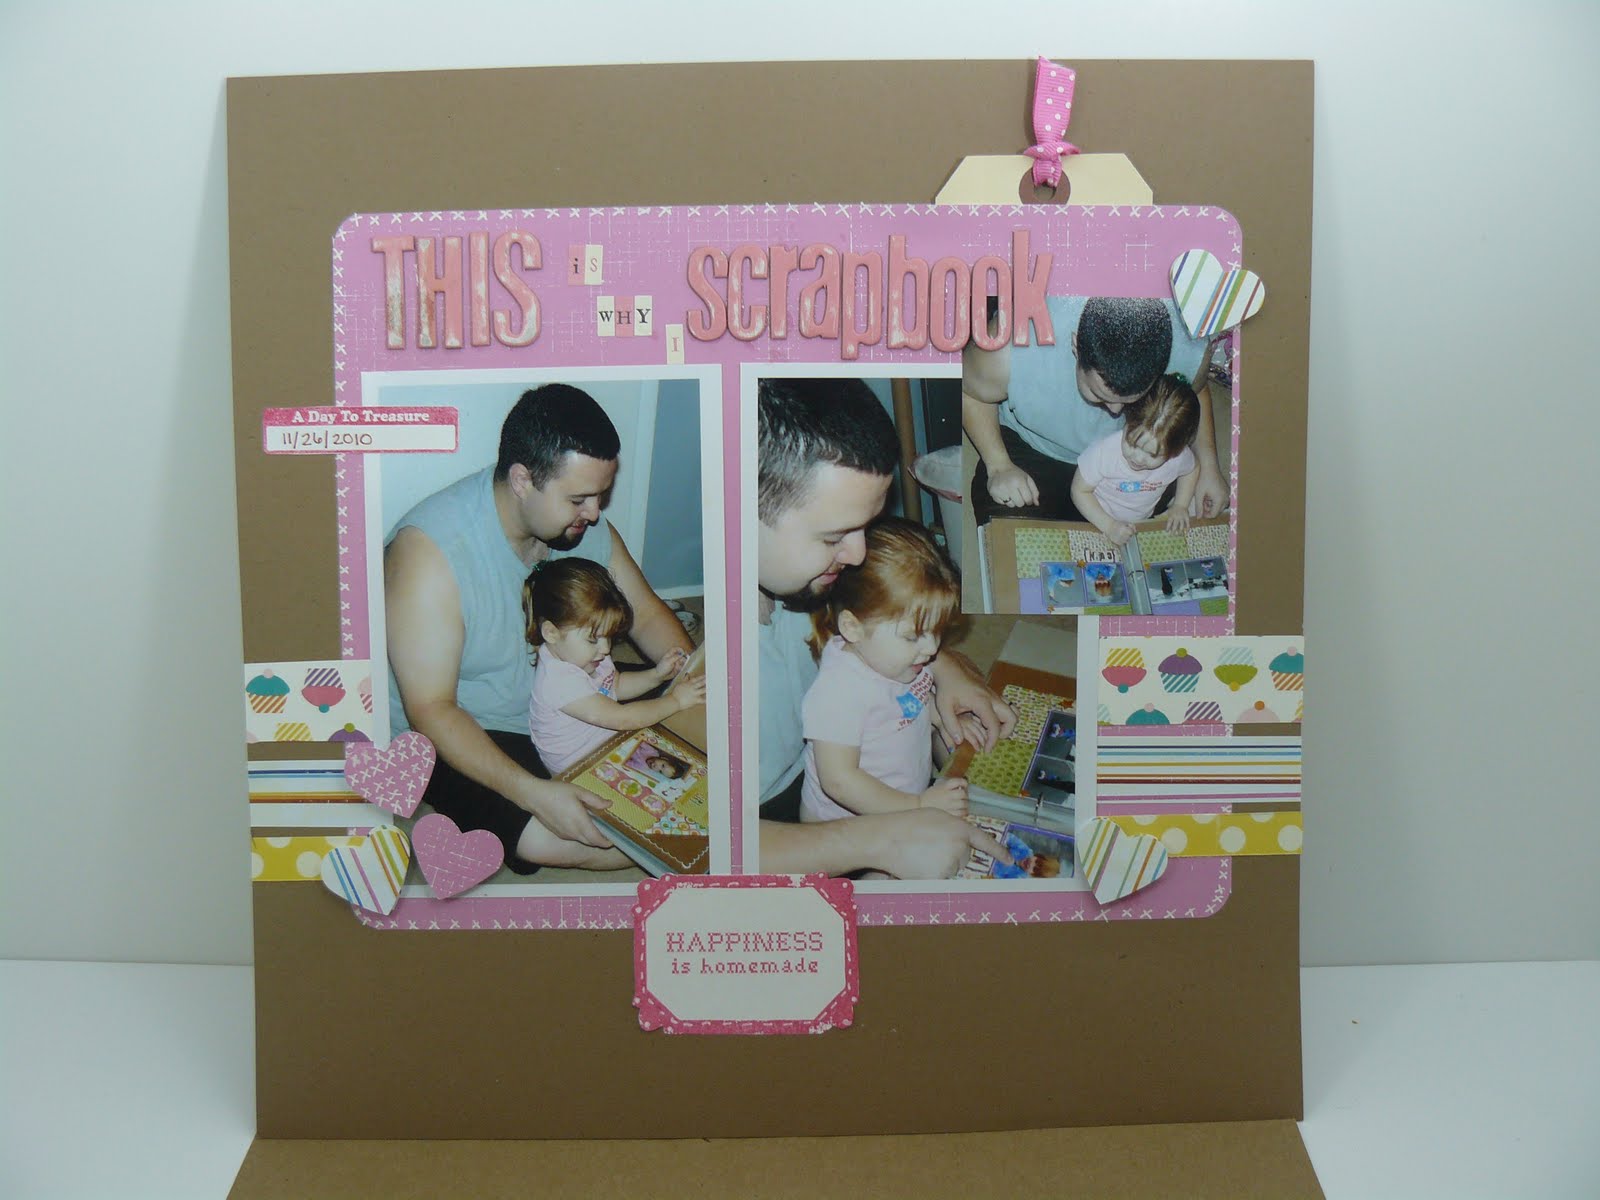
Happy Memorial Day! I hope you had a fantastic and safe weekend. Today I want to share with you my homemade all stash SMASH BOOK. Have you heard of these little gems yet? If not they are made by K&Co and you can a video about them here. I love the idea but I did not like that they were hardbound; I thought they would have little to no wiggle room. AND I have plenty in my stash so I got to it. First thing I did was cut some chipboard to 8.5 by 6 inches (two pieces) to make the front and back covers. To cover the front and back pieces I used THIS paper that I made for a counterfeit kit back in March! Using a corner chomper I made everything look like a ticket. All the thickers are from my stash, using up all those alphas! I also used some of my homemade washi tape (tutorial HERE) on the bottom, and lots of staples.
I then decided that I wanted six categories and had my amazing hubby punch me out lots of chipboard tabs with my McGill punch. My sections are Colors/design; Ideas; Create/copy; love; everyday life; and Out of the mouth of Caitlyn. The possibilities are endless so don't confine yourself to six if you need more.
Then the super fun part, picking out papers from my stash, printing off ones online and then cutting lots of plain printer paper and card stock to size. Most of my papers are the same size as the covers but some are not and not everything is lined up perfect; I liked the sort of messy look to it, since life for me is not clean and linear. Let's see I have some cork paper, canvas paper, corrugated cardboard, chalk stock, lots of various patterned paper, computer paper, card stock, Kraft OF COURSE!, and watercolor paper. You can put anything you wish. I also have lots of ledgers and lined since I love them too.
Then I just organized it like I wanted it and used my BIA (bind it all) to bind it all together. I like it and have already "smashed" some things in there. I hope you make one too and if you do please link me up!
Hello Friend
This is layout 11 I do believe for Counterfeit Kit this month. I made this prior to losing my mojo and I really like this one. I used my cuttlebug which has been neglected as of late. I also used a sketch from Allison Davis (but since I took all my books apart and put them by number of photos I can't tell you what volume sorry!). These pictures are from last June (see a pattern here?) when we visited the National Museum of Natural History for the first time. C loved these little statues and thought they were real! She was really talking to them, and hugging them! So cute!


29 May 2011
You are the KING of my heart


Happy Sunday. I hope this post finds you well and enjoying this great holiday weekend. Don't forget to pay tribute to all those we have lost along the way. Today I am here to share with you a layout using Father's Day cricut cartridge (on sale for 23.99 at Scrapbookpal.com and there is FREE shipping over 25.00! YAY).
You should know by now that I love to try to use the carts in different ways. I had several ideas for this cart to include a page about Caitlyn playing basketball but I have not printed those pictures out just yet so this is what I came up with for you today. Somehow it came out a bit patriotic but that is OK since it was Fourth of July time (well OK end of June!) last year.![]()
You will need the following to complete this layout:
Fathers Day Cricut Cartridge
Signo White Gel Pen
Tim Holtz Paper Distesser
Tim Holtz sanding block
Chestnut Roan ink
ATG
Zig glue pen
Zig journaling pen
Foam tape/pop dots
1. Using Father's Day Cricut cartridge and Expression cut the poker chips/cards at 2.5 inches. I cut mine from white card stock and colored it in with my Bic markers. Cut the chips with black coordentions paper at 2.5 inches. Embellish and layer cuts; adhere with Zig Glue pen.
2. Crumple up red paper, distress edges using Tim Holtz paper distresser. Ink with Chestnut Roan Ink.
3. Adhere background and distressed strip using ATG and Tiny Attacher.
4. Mount die cut with foam tape/dots.
5. Distress and ink edges of photo; adhere.
6. Journal; ink edges and adhere.
27 May 2011
Counterfeit Blog Hop-Who is your favorite? and BLOG CANDY!

Happy Friday! Do you have big plans for this weekend? I sure do, NOTHING! We have been so busy with doctors, dentists, helping friends and just everyday life I need a LONG break of doing NOTHING! I hope to craft, maybe enjoy some yummy grilled food and sunshine right here at home. Ahhh perfecto in my opinion!
I hope you enjoy your weekend and welcome to the Counterfeit Kit Blog Hop for May. You should have arrived here from our wonderful Guest Designer Jennifer. This month the challenge was to choose your favorite (or one of your favorite) manufacturers and scrap lift from their blog. I choose My Minds Eye this time around as I love the new Lime Twist, however I did not pull that for my kit this month so I used all Echo Park and Nikki Sivils in this bright layout.

I loved how Shanna had just one focal photo and adored the circles she used. I am not sure you can tell but in my layout I also punched several circles from the white patterned paper and pop dotted them on top of themselves to give it some more dimension. This photo was taken in June of last year on our trip to Florida for Father's Day. I did a pull out tag on the top for the journaling. I made the title "Good times" using new stamps and pattern paper. I am really liking making my own embellishments right now.
Blog candy? Did someone say blog candy? Yes I did, but my camera died before I could get a picture of it, so it is a mini album kit, everything you need to make a mini album. All you have to do is become a follower of the Counterfeit Kit blog (if you are not already) and leave me a comment here. I would love you to follow but only if you like my work. I will draw a winner using random.org and check to make sure you are following and left a comment sometime on Monday. So make sure to check back then!
You are now off to the next stop JESSICA! Enjoy!
26 May 2011
Bowling Time!

Good Thursday morning. I apologize for being MIA this week on here and on my commenting. Everyday life of doctors, dentists, helping friends, house hunting (again), and just life was hectic, but it always is so that is no excuse. In the midst of all this I seem to have TOTALLY lost my mojo :(. I sure hope it comes back
These layouts are done with my bowling kit and some scraps. I am so happy I am using the bowling embellishments! YAY!
22 May 2011
Embellishment Challenge
Are you up for a unique challenge? Can you handle it? I think you can so jump on over to Counterfeit Kit and read up on the embellishment challenge. Basically you choose an embellishment (or in my case since I don't follow directions apparently) a few that you made and focus your project(s) on those items. Here are the embellishments that I made and the two layouts that will sit next to one another in my albums that use the homemade embellishments.


 These pictures are from June of last year (yep I skip around a lot when scrapping). C got to feed a giraffe and she was thrilled and still talks about it. She fed the giraffe cookies and alfalfa(?). I made the Summer ABCs using word and word clip art. The clouds are double stamped and pop dotted to give some dimension. The banner with the faux sun I used to journal and as an accent piece and the giraffe alphabet card was a direct copy from the kit that we counterfeited this month. I actually had a great time making my own embellishments since I do not do it often. What about you? Do you make most, some or none of your own embellishments?


 These pictures are from June of last year (yep I skip around a lot when scrapping). C got to feed a giraffe and she was thrilled and still talks about it. She fed the giraffe cookies and alfalfa(?). I made the Summer ABCs using word and word clip art. The clouds are double stamped and pop dotted to give some dimension. The banner with the faux sun I used to journal and as an accent piece and the giraffe alphabet card was a direct copy from the kit that we counterfeited this month. I actually had a great time making my own embellishments since I do not do it often. What about you? Do you make most, some or none of your own embellishments?
19 May 2011
Stuck in a rut?
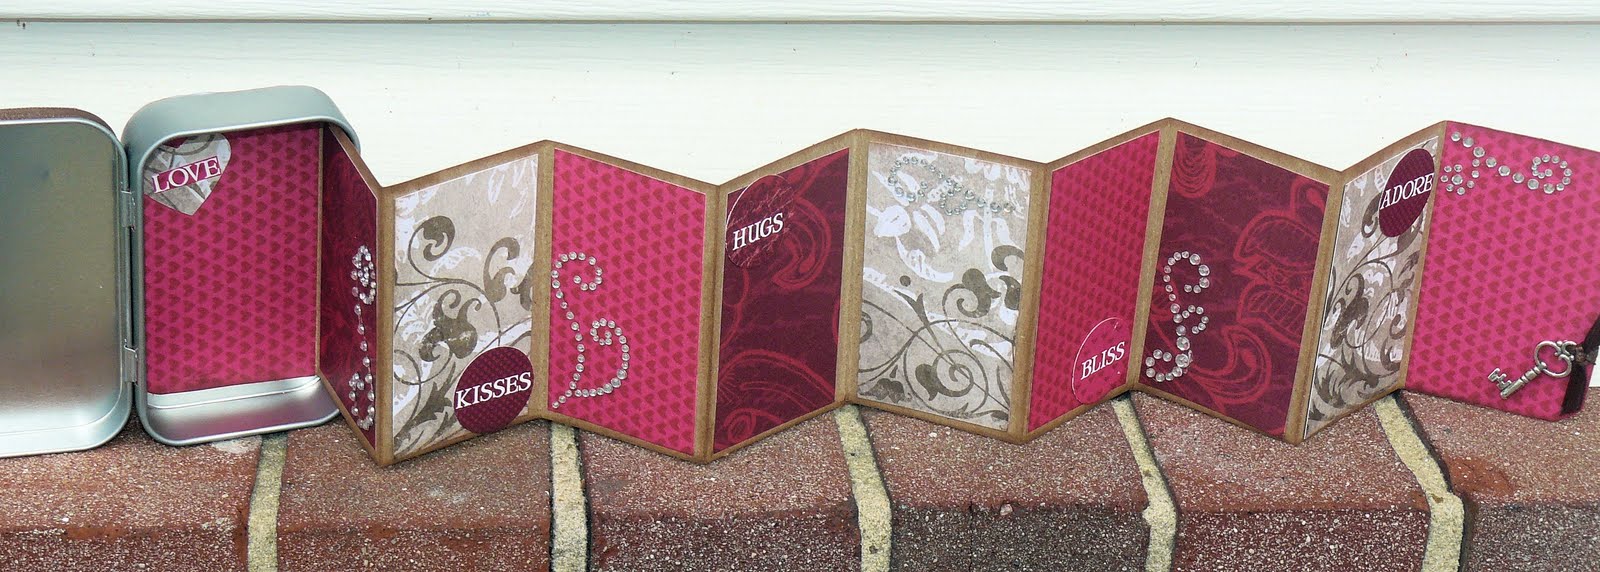
I hosted a "stuck in a rut jar" swap on the CMB. I love having ideas to draw from and so I was hoping others would like it, they did. Here is what I made for my partner Dansgg. She says she loved it I sure hope so. I did TWO others before this one and trashed them both, I think I need my stuck in a rut jar for making this one LOL! Dansgg loves pink and gray so I pulled some Echo Park Be mine paper, and went to town. What do you think?
 The can and the mini comp book I did for her.
 The top, I did not like this part.


 The can and the mini comp book I did for her.
 The top, I did not like this part.

18 May 2011
SoCal Scrapbooks-with Echo Park

Good morning! It is a soggy dreary one here today but that is just fine with me, I need a break. Before I run off to start my day and keep little miss occupied I wanted to share with you the new creation I made for SoCalScrapbooks. SoCal sent me the SUMMER DAYS Echo Park collection (including brads and rubons woohoo) to work with. The following layout is a bit different (read brighter and more patterns) than my normal style but I think I like it. Do you see those flowers? Yep those are rolled cheesecloth and sprayed with various glimmer mists. I really like them! Don't you just LOVE the papers in this line? So why are you still here, why aren't you clicking SoCal Scrapbooks and shopping already? LOL! Enjoy your day!

17 May 2011
Aunt Nikki (Counterfeit Layout 8)
 Ok I will confess, only about 1/2 of this layout is from my original kit. The paper and flowers were not in my kit but they were the ones from my stash. I have had those flowers since I started seriously scrapping in 2007. WOOOHOOO! So excited! These pictures are from last June when Aunt Nikki came to visit. You know that friend that you can always pick up JUST where you left off even if it is years since you last saw one another? The one that you can tell all your secrets too and that has seen you at your worst and still likes you? Well that is Nikki for me. We went to high school together and barely knew one another; then we ended up roomies in college due to our original roomies deciding to live together. Caitlyn loves her and goes RIGHT to her. She is part of our family. I tucked some more journaling behind the paper on the upper right, and used the other part of the ticket to allow someone to pull out and read if they so desire.
16 May 2011
Fun in the Sun (LO 6 &7)

Hey y'all. I hope you had a great weekend. We had a busy but definitely fun one with the inlaws in town. I am so excited to scrap the pictures of the pirate cruise we went on. WOOHOO! Anyways, here is a double page layout that I got done with my May Counterfeit kit. I am super excited that I got to use not one but TWO of the sandcastles I had laying around in my stash. I feel like this layout is missing something so any suggestions would be greatly appreciated. How are you doing with your Counterfeit Kit?
14 May 2011
Spoil me swap
On the Cricut Messageboard I hosted a swap called Spoil Me. Here are the homemade items I created for my awesome partner and friend Jamie. Let me know what you think.
 Mini wooden clipboard with grungeboard charms covered in glossy accents.
 A huge wooden clothespin for holding photos or notes.
 Super simple altered memo pad I found at J's.
 "J" hook

 My first ever mini album in a tin. I sure hope she liked this one as I was unsure of it.
 Mini wooden clipboard with grungeboard charms covered in glossy accents.
 A huge wooden clothespin for holding photos or notes.
 Super simple altered memo pad I found at J's.
 "J" hook
 My first ever mini album in a tin. I sure hope she liked this one as I was unsure of it.
13 May 2011
You make my heart race!
 Happy Friday the 13th! I hope you have lots of GOOD luck and wonderful times today! Today I am here to share a card I made for my hubby using Father's Day Seasonal Cricut cart that Scrapbookpal.com sent me. The inside reads, "You still make my (insert heart shape here) RACE!!!) hence the title of the post LOL! Did you know that they are now carrying the SEW EASY!?! WOOHOO! Oh and the free shipping over 25.00 yes that still ROCKS! So let's get started!
You will need the following items to make this card, substitute as you see fit of course.
Father's Day Seasonal
Going Places
Signo white pen
Colorbox Dark brown cat's eye
French blue ink
black pen
chipboard sun with orange and yellow ink applied
Kraft, white, green, black, blue card stock scraps
tiny heart punch
1. Using Father's Day and the Cricut of your choice cut the speedboat at 2.5 inches in black. Cut the layer at the same size in green. Back with white card stock inked in green.
2. Embellish boat with white pen, black pen and ink.
3. Using Going Places cut the waves (water) (page 48 button 24) at FIT TO LENGTH of 5.25 inches out of blue card stock. I think it ended up being around 2 inches or less?
4. Embellish with Signo white pen and tuck punched hearts in waves randomly.
5. Hand draw or stamp clouds, outline in white pen, color or stamp in blue.
6. Adhere everything at desired position using ATG, Zig and mini glue dots.
7. Attach the chipboard sun using mini glue dots.
8. For the inside I simple cut two rectangles from scraps to nestle into one another and rounded the corners. Ink edges and use a pop up dot to give dimension to the heart. The inside reads, " You still make my (heart) RACE!"
9. Ink outer edges of all card sides.
Closeup of the waves and tucking of the hearts.

11 May 2011
Homemade washai tape mini tutorial
Good morning. Today I have a mini tutorial to share with you. Have you seen the washai tape that is so popular right now? It comes in every pattern and color imaginable but I don't need or want 10 yards of one pattern so I figured I would try to make my own. I added this to my main Counterfeit kit and hope to use it soon. So let's get started.
It is super simple. You will need either paper tape, I got mine in the health/injury portion of Dollar Tree, or masking tape will work too. The paper tape is more translucent while the masking tape will be darker and hold more color. It is your preference. You will also need various inks, stamps of your choosing and a surface to work on. My surface is from a two pack of bendable Teflon cutting mats from the kitchen section of the Dollar Tree. Trust me these ROCK, nothing sticks to it and you can use it for gluing, glittering, etc. They bend so when you are done with flocking, glittering or other messy crafts you can simply bend and pour the remaining stuff back into the container.
OK for the first step you will measure out the desired length you wish and place sticky side down on your non stick surface. I placed mine on the cutting mats I described above.

Now here is the fun (and messy) part. Pull out those inks and stamps and go to town. We all know that I love brown and polka dots so I did some like that with chalk ink (which gives it a soft look). While Stazon-on was used for the top damask red/black one, as you see it is a bit more vibrant. I was also excited since I was FINALLY able to use a bunch of those dollar stamps we all have to have. I also did some faux stitching with white pen and created some stripes that I am always in need of. The only limit is your imagination.
Easy peasy. I hope you enjoyed this and will try it. Please link me up if you do! I will be showing you a creation I made with these later on this month, so make sure to come back for that!
It is super simple. You will need either paper tape, I got mine in the health/injury portion of Dollar Tree, or masking tape will work too. The paper tape is more translucent while the masking tape will be darker and hold more color. It is your preference. You will also need various inks, stamps of your choosing and a surface to work on. My surface is from a two pack of bendable Teflon cutting mats from the kitchen section of the Dollar Tree. Trust me these ROCK, nothing sticks to it and you can use it for gluing, glittering, etc. They bend so when you are done with flocking, glittering or other messy crafts you can simply bend and pour the remaining stuff back into the container.
OK for the first step you will measure out the desired length you wish and place sticky side down on your non stick surface. I placed mine on the cutting mats I described above.

Now here is the fun (and messy) part. Pull out those inks and stamps and go to town. We all know that I love brown and polka dots so I did some like that with chalk ink (which gives it a soft look). While Stazon-on was used for the top damask red/black one, as you see it is a bit more vibrant. I was also excited since I was FINALLY able to use a bunch of those dollar stamps we all have to have. I also did some faux stitching with white pen and created some stripes that I am always in need of. The only limit is your imagination.

Now here are some tips I learned:
- Make sure the paper tape/masking tape is flat otherwise you will get the crease as I did in the second one.
- Masking tape is an option if you do not want your background card stock to show through.
- You can EASILY crinkle, pleat the paper tape, but make sure you DOUBLE the length at least.
- For storing the finished homemade washai tape, I found it best to keep it on the non stick surface until ready for it, as this prevents it from sticking to everything else or creasing.
Easy peasy. I hope you enjoyed this and will try it. Please link me up if you do! I will be showing you a creation I made with these later on this month, so make sure to come back for that!
09 May 2011
NSD Creations
Second post for today. NSD Winners are HERE or just scroll down a post!
Happy Monday! I hope your weekend was fantastic. Did you get some scrapping/creating done for National Scrapbook Day on Saturday? Were you spoiled/loved/appreciated yesterday for Mother's Day? I sure hope so! I was! See posts below NSD winners.
So today I wanted to share with you the creations I made for NSD (well almost all of them) One is a gift and can't be shared just yet. Everything I made was from my COUNTERFEIT KITS for this month! YAY! I played along with some challenges at Scrapbook.com and WON! WOOHOO! That was really exciting, and I am super glad I got done what I did! So here you go!
My first layout of the day was about WHY I scrapbook. I am not sure this was for a challenge but I thought it was pretty appropriate to do on NSD! LOL!
My second layout is one of my favorites as of yet, not because of the layout but the pictures. They crack me up! The journaling reads,
"Caitlyn I am not sure WHAT upset you or WHY you were so angry but I had to capture it. One day you will look at this and maybe you will be upset with me or maybe you will laugh like I will. You see, may baby drama queen, you were NOT always good and full of smiles. You are also stubborn, dramatic, and quite frankly a handful. Parenting you is my greatest joy and frustration, but I love you FOREVER baby drama queen."
The third and fourth layouts will sit side by side. They also were for a challenge, but only one got posted in time! They are from our first ever visit to the National Zoo. Caitlyn and her BFF loved the meerkats and elephants the most. We spent half the trip at the meerkat display! The fourth layout just cracks me up. I LOVE the look on Mama Gorilla's face, so I thought the title was very fitting!


The final layout I have to share today is the one that won me a prize package over at scrapbook.com. It was a random draw with the challenge being use a homemade flower embellishment. I actually do not like this layout that much but it works. This is DH's sister, C's only blood Aunt. I do like how I did the title though! Love those little word stickers! The flowers are made with a heart punch, white pen and ink.
 So what did you get done this weekend? Link me up I would love to come and see what you made/did. Have a fantastic Monday!
NSD winners
Good early Monday morning! I hope your Monday goes well after this fun weekend. I can't sleep so I am up blogging hehehehe. First I want to thank all the ladies that entered my challenge this weekend! I am surprised there were so many! So thank you! I hope you had fun with it. I know I said I would pick only TWO but I couldn't decide so here are the top three. Please email me at wkucmb at gmail dot com with you full first and last name, mailing address and which place you won! So without further ado are are the winners!
Third place: J-bear at J-bears home for her butterfly card. I love the colors and the text paper!
Second place: Char Dobson at Vanilla Bean Creations I liked her color scheme and I adored all the embossing and even though I think she was a little late I will let it slide since she is in a different time zone and I forgot to take down Mr. Linky (sorry!)
First place: mytwoandras at My pair-a-dice I just loved how she used the leads, I would never have thought of that! The papers went well together and I was impressed that they were so old! Great job hon!
Congrats to all the winners!
08 May 2011
My heart is full!
Happy mother's day everyone. To every woman that has at some point loved a child, or filled a void HAPPY MOTHER'S DAY! I hope your day is fantastic.
I am so lucky. My heart is so full. My wonderful hubby and daughter have spoiled me all weekend. Yesterday I got to scrap most of the day with only a few interruptions. Today DH made me breakfast, I got a nap (and may get another one!) and my gifts just made me so happy. I don't need material things, he knows that. He knows that the ones they make for me are the ones that will guarantee tears. He got tears!
While I was away last weekend working a consignment sale, they set up a photo shoot and got the most gorgeous shot of my little girl. She looks SO GROWN UP! He framed it and wrapped it up. The card is a sunflower with DD's thumbprints as the center and inside it basically says that I am doing a wonderful job sowing the seeds of success and love in our daughter! Then the hand prints. OH my! I love them, I hope he does them every year I want to hang them all up in a huge frame for each year just to document how she has grown. I did something similar for him for his first Fathers Day and we compared them and I just started bawling. BUT the BEST GIFT is this morning the first thing Caitlyn said to me was "Good morning Mommy! Happy Mommy Day! I love you!" THAT was all I needed! I love my daughter and my hubby, even when they frustrate me. I hope your day is as fantastic as mine!

 hahhaa like my Mickey Mouse jammies I stole from hubby! I love them!
07 May 2011
Two NSD challenges for you! With a prize!
This post will stay up top all week, scroll down for super fun things coming to include my May Counterfeit kit!
Good morning. Yes, I know that NSD (National Scrapbook Day) is NEXT weekend but I wanted to give you a head start on my games. There are two challenges where you can win a BNIP Hello Kitty Greetings Cartridge OR Maya Road Ticket stamp plus other goodies. BUT you are going to have to create for it! LOL! Yep a little bit of work. You can create ANYTHING you wish as long as they have a scrap of paper somewhere on there! Cards, layouts, altered items, home decor, whatever!
You may choose one OR both challenges and link up to Mr. Linky. I will pick my top two favorites with the help of C! So what are the challenges?
Here you go!
Challenge ONE: Make a BINGO using the below bingo cards, three in a row across, down, or diagonal only. There are two cards so there are two chances to win. Please tell me which three you used in your creation.
Challenge TWO: UPCYCLE! I am big into altering/reusing things so that they do not end up in our dumps. So for this challenge UPCYCLE something that you would otherwise throw away on your creation. Please notate what it is in your post.
DIRECT LINKS ONLY! NEW PROJECTS ONLY! Any creation goes, as long as there is paper somewhere on it! Have fun! I can't wait to see what you make! Deadline is 10 PM on May 7th 2011, I will pick a winner the following Monday! Happy NSD and Mothers Day!
Scrapbooking Bingo
CARD ONE
| Use more than three photos | 3 buttons/brads | Hand write your journaling |
| Use a die cutter (your choice) | DIMENSION! You must have at least one item that “pops” | Ink something. |
| Arrows or stars | 4 patterns | Use something from before 2008 on your page |
CARD TWO
| NO flowers | Hand Journal | Stars |
| 5 or more photos | NO BLING | Tag/ticket included |
| At least 1/3 white space | Border strips | NO PINK |
06 May 2011
My May Counterfeit KITS!
Yes that is right I said KITS! I put together the main kit, a boy add on, a zoo ad on and a bowling add on. Did you catch all that? Let me show you my yummy kits that I can't wait to start using as soon as we feel better (dumb allergies/Spring colds).
 May main kit embellishments. I went with a summery/fruity fun and bright feel this month.
 My May super bright and fun summery pages. Some brands represented are Echo Park, MAMBI, Nikki Silvis, Recollections and I am sure there are more. I have lots of summer photos from our short trip to Florida last year and pulled them first then matched my hit to those pictures.
 Caitlyn's first and second bowling trips happened during the summer and I have a few pictures of her last birthday to do (we went bowling with friends).
 Here is my take on a boy add on kit. Since I do not typically scrap for a boy I did not have much BUT there is some things in there for hubby's pages (tools gear etc) and then some that will work for pages about my Dad (fishing/hunting) and the rest will be used on C's pages since she is such a tomboy.
 While in Florida we had a great day at a local safari like place so I pulled lots of zoo things as an additional add on. I have pictures of C feeding a giraffe and much more.
 Now these I am super proud of even if the lighting stinks. I tried my hand at counterfeiting the majority of the embellishments in the main kit. I will have further directions/tutorials and close ups later on this month! What do you think so far?

A few more that I made along with some odds and ends I found while digging/shopping my stash.
So there are my kits, what do you think? Are you motivated/inspired to make one for yourself now? There is no wrong or right way to do this, except to shop your stash, make it your own style and have FUN! I can't wait to feel better and see what you all make and start creating. Happy NSD (tomorrow) and Mother's Day. I hope you have a fantastic weekend!
 May main kit embellishments. I went with a summery/fruity fun and bright feel this month.
 My May super bright and fun summery pages. Some brands represented are Echo Park, MAMBI, Nikki Silvis, Recollections and I am sure there are more. I have lots of summer photos from our short trip to Florida last year and pulled them first then matched my hit to those pictures.
 Caitlyn's first and second bowling trips happened during the summer and I have a few pictures of her last birthday to do (we went bowling with friends).
 Here is my take on a boy add on kit. Since I do not typically scrap for a boy I did not have much BUT there is some things in there for hubby's pages (tools gear etc) and then some that will work for pages about my Dad (fishing/hunting) and the rest will be used on C's pages since she is such a tomboy.
 While in Florida we had a great day at a local safari like place so I pulled lots of zoo things as an additional add on. I have pictures of C feeding a giraffe and much more.
 Now these I am super proud of even if the lighting stinks. I tried my hand at counterfeiting the majority of the embellishments in the main kit. I will have further directions/tutorials and close ups later on this month! What do you think so far?
A few more that I made along with some odds and ends I found while digging/shopping my stash.
So there are my kits, what do you think? Are you motivated/inspired to make one for yourself now? There is no wrong or right way to do this, except to shop your stash, make it your own style and have FUN! I can't wait to feel better and see what you all make and start creating. Happy NSD (tomorrow) and Mother's Day. I hope you have a fantastic weekend!
05 May 2011
It is time! Are you ready to counterfeit?!?!?!
Good morning! Can you believe it is MAY already!?!?! WOW! I am here to share that this is the FIFTH month that Counterfeit Kit blog has been going, that is amazing, I hope they continue for a long long time! This month Bethany and Meridy selected the WORK IN PROGRESS May kit to counterfeit.
I have lots to show you this month, time for me to get creating! Link up at Mr. Linky HERE so we can all gush over the awesome kits you put together. I have a challenge, are you up for it? I challenge you to make the kit, and do at least THREE projects with it this month. Can you handle that? I can't wait to see it!

I have lots to show you this month, time for me to get creating! Link up at Mr. Linky HERE so we can all gush over the awesome kits you put together. I have a challenge, are you up for it? I challenge you to make the kit, and do at least THREE projects with it this month. Can you handle that? I can't wait to see it!
04 May 2011
Birthday list


I used another great sketch from Sketch Support located HERE for my inspiration on this mini album. I will (or someone I know) use it to list all the birthdays for each month so that no one is missed. The cupcake came out WAY bigger than I intended but I had fun with it. I used various circle punches, white pen, brown pen, my paper crimper and chipboard. The sprinkles are just strips of purple paper randomly cut and dotted with white pen. I ran the cupcake "holder" paper though my paper crimper, inked, and added faux stitching. Some of the circles are pop dotted and I added Glossy accents for the cherry top.
03 May 2011
SoCal Scrapbooks Second Design

Hey there. Just a quick post, if you have not checked out SoCal Scrapbooks, may I ask WHY!? Why are you still here!?!? Click and go!!!!
Today I am here to share my second creation for the wonderful Sandy using the Epiphany Button Maker found HERE. I wanted to really showcase the buttons and this is what I came up with!
Here is a close up of the buttons! I love it!

Subscribe to:
Posts (Atom)


