28 February 2011

Counterfeit Blog Hop!

Welcome to the Second ever Counterfeit Kit Challenge Blog Hop! There are THIRTY of us sharing today so if you just happened along my blog please start at the beginning HERE. You will NOT want to miss all the inspiration we have for you. We were all given a sketch from the sponsor this month Scraps of Darkness. Using the kit we put together this month we followed the sketch (or not) and now we are sharing our projects with you.

I used the sketch as inspiration as my style is more simple/linear and quite frankly I stink at clustering objects together. I love the look and TRY very hard but can't get past the "it looks like I threw up embellishments on my page" look. LOL! However on this layout I did a small cluster and used my Cricut (I hear your gasping shhhh!). On the back is a full length letter to Caitlyn in case something happens to me before she grows up. Just FYI!

I hope you liked what I created now please hop along to Bethany and her WONDERFUL project, this girl rocks the kits and the sketches! Have fun!

26 February 2011

Mini Mini using my kit

Wow. I am so impressed with myself this month, making this kit has really helped (along with the awesome challenges from Counterfeit Kit Challenge!) Here is a mini mini I made with this tutorial. Now mine is a little off as I do not think I folded it correctly BUT I am super proud of myself since I figured it out. Usually I get frustrated and either give up or have hubby do it, so I was super excited that I GOT IT! I know little things amuse me!

Here are some shots. I had fun posing it with some new props LOL! I plan on putting reasons I love Caitlyn or DH in it!


Welcome Spring-3 frames


Good morning! I hope you all are doing well. I am here today to share another creation with the super cute APRIL SHOWERS cricut cartridge that Scrapbookpal.com sent me to work with this month. Have I mentioned that they ROCK with super great customer service and FREE shipping on orders over 25.00 in the continental United States? Yes you read that right! I love free shipping! Anywho, here is what I made. I needed something to go on our dining room table since Baby Fishee (our Beta) passed away. So my great friend Jamie sent me these super cute black frames and I instantly had lots of ideas for them. I have ideas for each season so I can swap them out and have instant personalized home decor. How cool is that? OK enough about that here is what you will need to make these:

3 4X6 frames
April showers Cricut Cartridge
ATG and adhesive
Chestnut roan ink
Zig glue pen
Mini glue dots
Pattern paper of your choice
Fringe scissors
Tim Holtz Scissors
Signo Uniball white pen
French blue Colorbox Ink
Expression
12X12 mats
CropaDile

Let's get cooking, well OK creating!

Cuts needed: Using your Cricut, mats and April Showers cut the following in the colors of your choosing: Clouds at .75 and 1 inch two times; Flowers 2.5 inch and 3.5 inch; Welcome Spring at 2 inches, worm at 2 inches. Assemble as needed.

To make purple flower frame: Punch additional holes in the HUGE flower's center; adhere to middle and color in punched holes with signo white pen for added interest. Hand cut stem, crinkle up, ink and distress as desired. Using scraps of green cardstock and fringe scissors cut grass, ink with chestnut roan ink. Now assemble onto patterned paper background and insert into frame.

To make double pink flower frame: Stamp both flowers with polkadot background stamp in white, attach two white brads, and make grass as you did in step three. Assemble onto 4X6 pattern piece of paper, ink edges of clouds and insert into frame.

To make Welcome Spring frame: Accent "Welcome Spring" with white signo pen as you desire. Stamp polka dots on accent piece, adhere saying to middle of the accent piece.
Add googly eyes to the worm and draw on mouth. Assemble onto a 4X6 piece of pattern paper and adhere embellished worm.

Enjoy your bright and personal new home decor! You could change these up for various holidays or seasons. Here are some of the ideas I had I "heart" you for Valentine's; Luck o' Irish for St. Patricks Day; MOM, DAD for the respective days; USA for 4th of July; apples etc for back to school; Leaves and pumpkins for Fall; BOO or EEK for Halloween; Gobble till you wobble for Thanksgiving; JOY for Christmas time; and so many more. I hope you found this idea helpful!

25 February 2011

CFKC-Page Layout


I am not real sure of this one, but it is done. I did a little paper piecing but not a lot. I used a lot of stamps, one of the page pebbles (heart) that I made, and everything but the glitter pen was in my kit so WOOHOOO!

Metal baby! Frosted Designs Challenge


This week at the fantastic Frosted Designs the challenge is to use METAL on your creation. Well we all know that sometimes I take things wrong so I created this cookie sheet notes station, so instead of creating something with metal I created on metal. I made this one for Missy in the Valentine swap and she said she loved it. I used chalkstock for the top so she can write notes, hand painted and decorated the wooden clothespins into magnets, and made the paperclip magnets using glossy accents, pattern paper and clear marbles. The "NOTES" is also magnetic. I think I got a little magnet happy! What do you think? This was super easy and cheap to make as everything but the dollar tree cookie sheet and ribbon came from my stash! You could use the crop a dile and punch a hole or two in the top, thread some sturdy pretty ribbon and allow it to hang. I was not sure where she would keep it so I left that up to her.


23 February 2011

Winner and an apology!

I am so sorry this is so late. We were hit HARD this weekend with something and we are just now able to stand upright more than a few minutes. We made it to the doctors only for them to tell us that they are not sure but it is NOT flu, strep, or pnuemonia so that is good I guess. Anyways the winner of the awesome Cutting Cafe file according to random.org is

GLINDA!

Please email me at wkucmb at gmail dot com so I can get you into contact with the wonderful Regina!

20 February 2011

Cupcake Liner Flowers OH LA LA (Frosted Designs)

I just think these are adorable. They may not be for layouts but they could easily be for cards you will not send, home decor, minis etc. They are VERY dimensional. You can use less cupcake liners to make them less dimensional if you choose. Let's get started!


You will need: 8 cupcake liners, I used white so that I was able to spritz them to match an upcoming project; one green pipe cleaner per flower,and a hole punch (I used my crop a dile)
Line the eight cupcake liners in front of you.
Now squish them flat with your hand, they do NOT have to be perfect!
After they are all relatively flat, gather them into a stack and fold in half.
Using your crop a dile punch ONE hole in center of fold but NOT on crease!
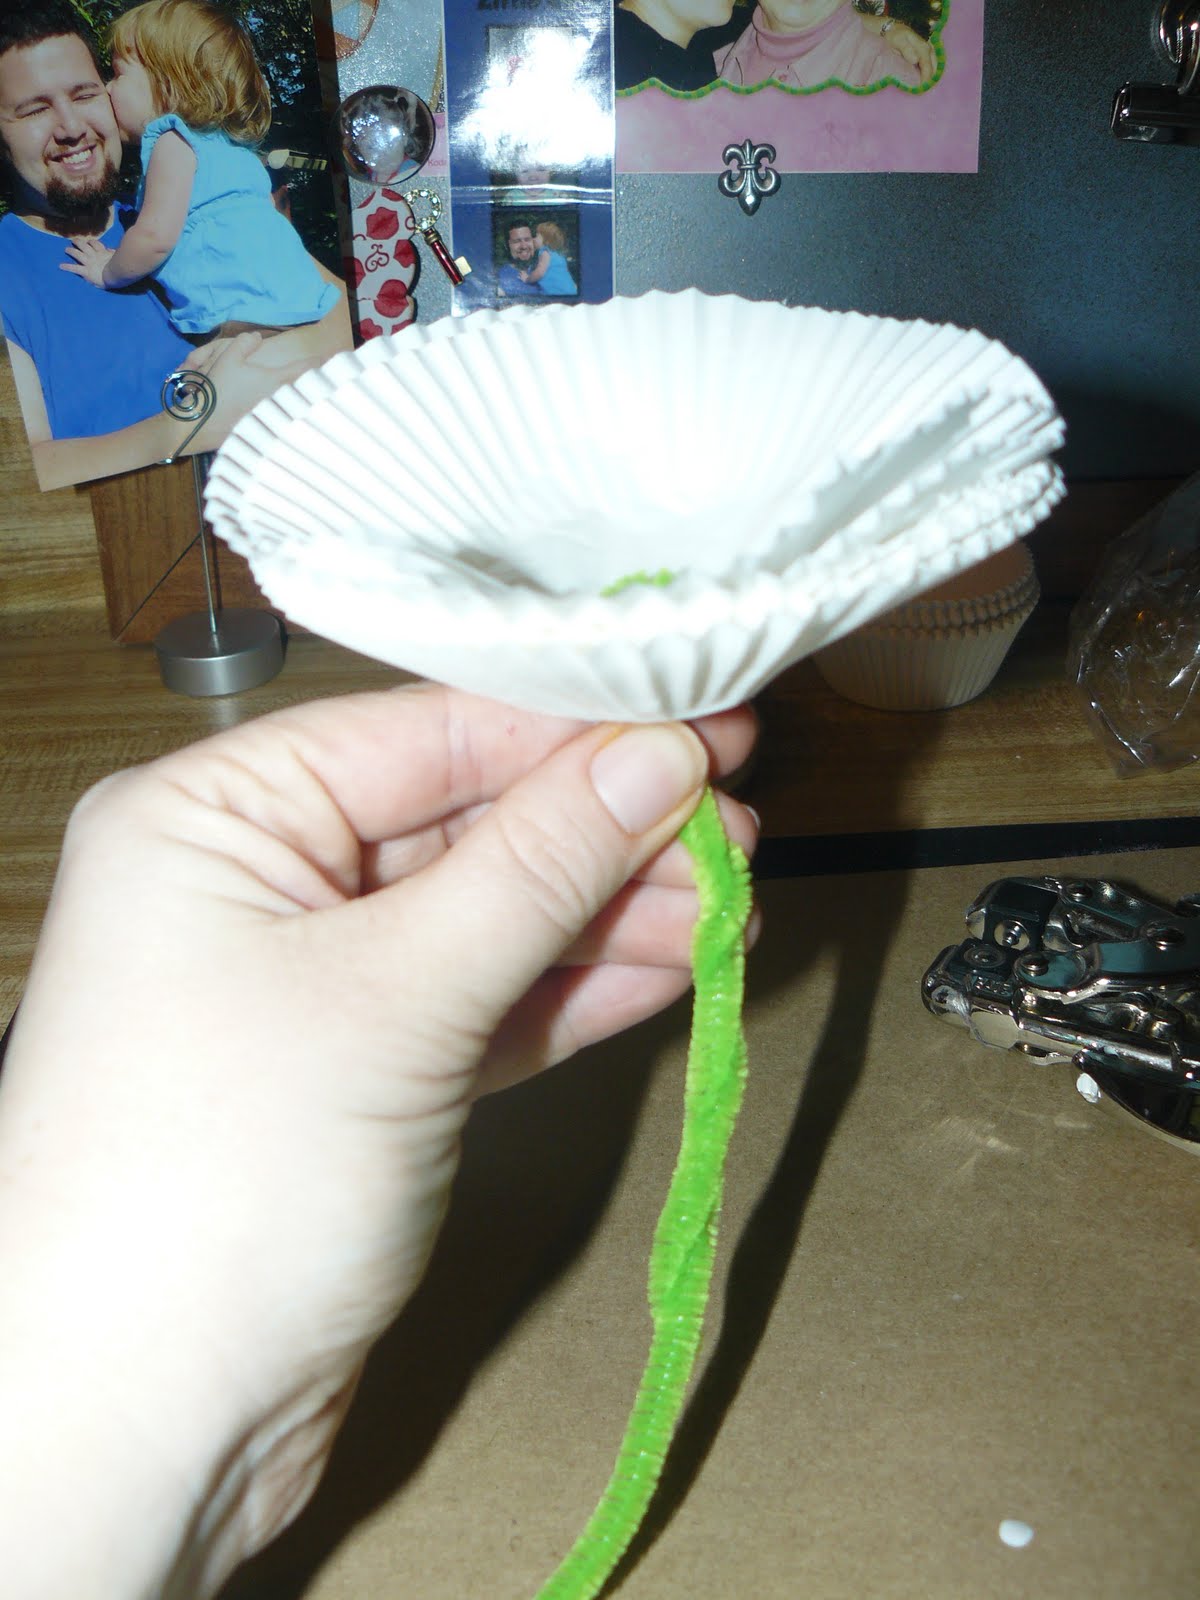
Open the folded liners to reveal two holes, now thread all flowers onto pipe cleaner, then back down through the second hole.
This is what the top inside will look like before you pull it tight.
At this point you can twist the excess of the pipe cleaner OR make a leaf like I will later on.
Now one layer at a time pinch the bottoms of each liner into the center. This is NOT perfect and is totally up to you.
What mine looks like before rearranging it a bit.
And here we go! What do you think? I plan on making some of these and placing in a little pot that Caitlyn paints for Grandparents Day this year. You could also omit the pipe cleaner and use glue dots to adhere the layers together in the center, then scrunch around a big blingy brad or a button. The possibilities are only limited to your imagination. Fancy them up with spray ink, shimmer, rhinestones, chalk, ink etc. Have fun with it, I hope you like them!

19 February 2011

Counterfeit Kit Challenge Birthday gift

I host and am a part of a great birthday club on the cricut messageboard (shocker huh?). We are to make a card and a homemade gift for each girl during their birthday month and then send 10.00 bucks to the gift coordinator who gets super fun things off her wish list. Well this month was a great friend from another birthday club Sue. I love making these super quick and useful acrylic post it note holders. I hope she really liked it. Here it is.

17 February 2011

Reading Time

Please remember to CLICK HERE for a fun giveaway from Cutting Cafe!


Today I have another simple layout to share with you. I have wanted to use the twine/ribbon etc wrapped around the page for some time now and this is how I decided to do it. What do you think? It will sit next to the Slide and Fun one from earlier this week. I find it pretty difficult to do totally masculine pages!

16 February 2011

CFKC Putting Pen to Paper mini challenge

Counterfeit Kit Challenge has a mini challenge going on: make a page without any pictures only journaling to tell the story. Well since I love to write I thought I would try and I loved it! I took the basic design for my layout from Bethany (loved your foundation). Almost Everything came from the kit I put together earlier this month YAY! I decided to do a page all about my feelings when I was pregnant. Everyone told me that it should be this wonderful joyous overly happy time when I was pregnant and honestly I was happy but it was not all that fun for me. So I wanted to make sure that Caitlyn knows this in case she is pregnant one day and feels guilty and horrible for not being a walking advertisement for happy pregnancy. Does that make sense? I had such guilt when I was sick all the time, frustrated, and all the trials/monitors/appointments (we were going three times a week to the doctor!). It was draining and even though I was thrilled to be carrying our daughter I was not a happy glowing pregnant woman LOL! So anyways here is my layout. I love it!


It is brighter in person but the lighting is horrible here today and well I am not a great photographer! I used lots of things that I have not in months, my paper crimper, stamping, heat embossing (LOVE), two of the page pebbles I made, and used two clips that were not in my kit but everything else was! YAY!

15 February 2011

Handmade charms for the cricut messageboard

I am hosting a handmade free for all charm swap on the message board. This is what I came up with. Pretty simple but I wanted something that could be used on a variety of projects. All I did was have hubby flattened bottle caps, punched dictionary paper, inked the sides, adhered with double stick tape, then filled with glossy accents. I let them dry for over a day then punched holes in the top and thread brown satin ribbon through, the new owners can change this if they wish. I sure hope they will like them.

Remember to scroll down one post for a giveaway from the awesome Regina at Cutting Cafe!


14 February 2011

Slide & Fun and a GIVEAWAY!

Good morning. Happy Valentine's Day! I hope your day is great, I got to sleep in until just before 7 am which in this house is AMAZING! Normal wake up time is around 5 am!

Today I have something super sweet and simple to share with you. The file I used for the awesome hearts can be found at Cutting Cafe(Fun with Hearts). Do you like those hearts? They are adorable, I think and just a sampling of the set. Want to win them? Just leave a comment here by the 21st on this post and I will draw a winner to win the set from the very generous Regina! How sweet is that Valentine candy???

13 February 2011

Counterfeit Kit Challenge Page Pebbles

Please scroll down for Scrapbookpal.com Design!

Yesterday I decided to try to make my own page pebbles. I used the glossy accents experiment and I am quite pleased with them. I love the dictionary one with the bling and chalk. What do you think?


Dream-Scrapbookpal.com

Good morning. I hope you all are having a fantastic weekend. Can you believe tomorrow is VALENTINE'S DAY? Are you ready? Do you do anything special? We usually do not but that is just fine with me since hubby treats me well all year long!

Anyways Friday was one of my DD's little friends birthday. I was told she had WAY too many toys so I made her two things. One you have already seen (on my blog) and now I get to share with you the last one that Scrapbookpal.com helped make happen! Gotta love those guys and the free shipping for all orders over 25.00 in the continental U.S. WOOHOO!

Thanks to them I was able to use April Showers and the awesome Signo Uniball white pen (LOVE THESE!) and make this adorable 6X6 doodle pad for the little girl. She likes to draw and I figured she could keep this in the car with a pen or pencil attached to the ring. What do you think?


Lets get started! You will need the following to do this project:
MS Fringe scissors
cutter bees
tweezerbees
chestnut roan
french blue
cuttlebug
Swiss dots
signo uniball pen
zig chisel
peeled paint
blender and foam
crop a dile
basic grey file system
april showers
mats
expression
atg gun
atg adhesive

tiny letters
sticko shimmering dots
heart punch
1.75 circle punch
white, yellow, Kraft, blue and green card stock
lots of printer paper
ribbon
metal ring
2 6X6 chipboard

Directions:

1. Using your 12X12 Expression mat, Expression and April showers cut the second tree (both layers) at 3.5 and 2 inches using appropriate paper.
2. Clouds will be cut at 1.5, 1 and .75 inches out of white and run through the cuttlebug using the Swiss dots folder and inked with french blue chalk ink.
3. Using Kraft paper cut the blank banner at 1 inch, dispose of last piece so you only have five banners.
4. Using Kraft paper cut the shadow butterfly at .75 inches twice.
5. Cut a 1.5 by 6 inch piece of green card stock then using Martha Stewart fringe scissors create grass, ink as needed.
6. Using 6X6 pieces of paper (pattern you choose) cover all sides of the two chipboard bases making sure to file in a downward motion to get a flush edge and to punch the hole each time with your crop a dile.
7. Now let's assemble. Adhere grass to bottom with ATG tape, adhere trees together (one uses a heart punch for the tree part and white doodling for extra detail), then place on the far right of the page.
8. Using a 1.75 inch circle punch create your sun, adhere with ATG tape, ink and file as necessary.
9. Adhere clouds wherever you see fit.
10. Adhere sticko shimmering dots to butterflies bodies, ink if desired.
11. Adhere tiny letter stickers to spell "Dream" on banner, then adhere with Zig chisel pen to board and place/adhere butterflies as if they are carrying it.
12. Spell the recipients name with little letter stickers on bottom left.
13. Decorate metal ring with various sheer ribbons.
14. Ink all outer edges of books with chestnut roan ink.
15. Cut, stack and punch a hole in a good amount of printer paper (5.5 by 5.5) as your filler.

12 February 2011

Homemade from the heart!


DH and I decided not to do anything too much for Valentine's day. I made the chocolate covered peanut butter hearts and made him a card. He made this yummy homemade pizza and bought me some 2.00 acrylic albums today! He is outside in the garage right now working on making Caitlyn a table so that she can have somewhere to color or it could be her nightstand we have not yet decided. Yes DH is that talented! Super duper!
Check back tomorrow for my design for Scrapbookpal.com

Also NEXT weekend there will be a small Cricut Card Fairy Blog Hop with prizes, you will start here and go along! Hope you join us!

11 February 2011

Yummy treats!


Homemade chocolate covered peanut butter hearts. I hope my honey likes them! Hope you all have a love filled weekend, cherish those near and dear to you and don't forget to tell and show them EVERY DAY not just Valentine's day! HUGS!

Frosted Designs Challenge

Good morning. I can't sleep so here is a post for you. This week over at the awesome Frosted Designs the challenge is to use the word LOVE! Our guest designer knocked it out of the park so make sure to go check it out! Of course all of my fellow DT sisters did a great job (as always too). Here is what I came up with. I made this for my partner (Missy) in the 5 days of Valentine swap!


It is a basic clipboard that I altered and turned into a photo frame where she can add various pictures through the year. She says she loved it so YAY! Lots of bling/glitter/shimmer on here.

09 February 2011

It is ALL Bethanys fault!

That is my story and I am sticking to it! LOL! I needed some "props" to display things and so off to Goodwill Caitlyn and I went. I spent 19.00 but I also got two books (one to read and one to make paper flowers from) a 12X12 3 drawer Sterilite container and a super cool clock for Jonathan, so awesome prices. Here is what I have to display things. I also picked up an embossed white ceramic plate from the Dollar Tree that will hold bigger items. I think I am set now. For the cloth etc I am going to be using Caitlyns shirts LOL! Hey it works! I have to figure out how to remove the prices that are written in black sharpie I think, any suggestions?

In the above picture I thought the margarita glasses would be super cute to display ribbon, trim, lace etc or even beads and baubles. The little white containers with cork lids would work well for borders or even pretty flowers LOL. The huge thing in the back left corner is an LED candle holder (I think) and will work well for various items.
In this picture we have four pieces, a small goblet with some intricate work on the outside, a small plate, a small corning ware pan (?) and a cup thing (sorry do not know proper terms for them). I figure they will work well for stands (thanks Bethany!) or to hold things! What do you think? Did I do good? Will these help with my pictures? Or did I just waste money? Be honest!

08 February 2011

Project 5: a simple card


This is my fifth project using my kit, pretty good for the third day of it huh? YAY! I did not have much time to create yesterday as I was playing broken record Mommy (Stop! Don't do that! Put your clothes on! Don't try to kiss the fish! Turn off your flashlight! Put your clothes on! NO!). I know everyone has those days but they are super draining to me! So anyways here is what I have to share with you today. I looked all around the house and came up blank for props to help my photos so I will see what I can find on craigslist/Goodwill later this week. Everything except the punch for the hearts was in my kit. See the wide "ribbon" that is the ACE paper tape that I stamped on! Super cool!