29 June 2011

Time for the MEN in our lives-Play along!


OK so you may have noticed that I am doing a lot of pink things lately, well that is because my MAIN kit was mostly pink, grey and cream. Well I was also in charge of putting together a single page kit that was themed in FATHER'S DAY. What a nice change of pace for me this month, as I thought I may puke if I had to see pink again LOL! I am NOT a girly girl by any means. Nothing wrong with that, but it is not me. So here is the kit I put together, the sketch I choose for us to work with and the layout I did. I hope you play along and use the sketch, please link me in the comments!


This layout is of C and my Dad last year about this time when we were home visiting for a bit. They were inseparable and although it is NOT Father's Day themed, it is about my father and his relationship with C. I did change a few things from the main sketch but the most noticeable is that I did my journaling on a tag and hid it behind one of the photos. The circles I included are not 2 inch, but 1.75, I did not like them down the entire page like in the sketch so I made them just around the main portion of the layout. I did add some blue thickers from my stash since I was not in love with so much black on the page. There are LOTS and I mean LOTS of staples on this layout, yes I was having fun with my Tiny attacher LOL!

27 June 2011

The "I's" have it..........blog hop time!

Before we get started on the blog hop, I need to announce the winner of my blog candy from the Jumpin June Bug Swap. Random.org choose comment 10 which is CAMMI! Please send me your mailing address so I can get the candy out to you later on this week! NOW it is time for the Counterfeit Blog Hop!


Good morning! Three more days until I am 30! WOW! I hope you came from TRICIA, aren't her creations wonderful!? If you are just happening upon me then please start here at the Counterfeit Kit blog hop for some awesome inspiration and so much more! When you are done here you will go visit the magnificent JESSICA.

This month we were challenged to do an "I" statement page. For more information on this please check it out HERE. I decided to focus my page on journaling use most of the prompts that Susanne provided. I wish my handwriting was better, but don't we all? I still think it is important to include it.

For this page I used one of the chipboard mini album pages from my add on (I did not end up making the mini for a friend, I did some other things). I painted it with white acrylic paint, stamped polka dots with brown acrylic paint and then used the eraser of a pencil on my desk to do the bigger pink polka dots. It was very messy, something I usually do not do! Pink chalk ink edges the side. 1.75 and 1.5 inch circles (9) house my journaling and some embellishments. I FINALLY used the awesome pink pleated ribbon YAY! On the side of the photo (which I will have hubby take on my 30th birthday) are some word stickers from my main kit that remind me of me right now. The thickers for the title are grey, but they came out looking black (sorry about that!). Lots of bling and my trusty Martha Stewart butterfly punch using scraps from my kit (more bling on their bodies) and we are done! VERY girly but I like it!

26 June 2011

Shabby chic is growing on me.

If you are here for the Jumpin June Bug Blog Hop please scroll down one post!

Looks like I am getting better and better at this shabby chic/vintage/distress style since lately ALL of my swap partners are into it! Gives me lots of practice! Although it is not my favorite style it is nice to step out and try it and have it go semi right! The following items I made for my Secret June bug on the cricut message board. She received them awhile back so I hope she liked them like she said she did. Here we go.

I found these super cute and small notebooks at Joann's a while back. They are Kraft colored and have a burnt looking papers inside.
It is hard to tell but I used the Viva Decor pearl pens on this one, but smeared it all over for a pearly shine.
This was the first time I had tried to do two step crackle, it came out alright I think.
This is another altered luggage tag from Michael's dollar bin that I turned into a bookmark of sorts. I sure hope Terri liked them as she said her favorite colors were green and brown right now. I tried to do her style, I hope I got it right. I also included some fun store bought goodies, picture below.

25 June 2011

Jumpin June Bug Blog Hop!

Good morning! Welcome to the Jumpin June Bug blog hop. This hop is comprised of ladies that were in a swap on the CMB together.I hope you enjoy all the summery creations they made. If you happened here from DGirlLV you are in the right place, if not please start at the beginning HERE.

Today I have a layout to share with you that is doing double duty for me. I used the Echo Park Summer Days collection from SoCal Scrapbooks. I used several patterned papers, rub ons(which I never use but these were great!), brads, stickers, and even made my own third ice cream cone. I used the cover sheet where it shows all the items in the kit, cut out the little striped/polka dotted ice cream cone, backed in card stock and pop dotted with the other two ice cream cones that were just stickers in the set. I was pretty proud of myself for using what I had and making it work!

Your next stop on this blog hop is my awesome friend Doodles. Happy Summer!


This other layout is also made using the EP Summer Days but I do not like it so much. I just could not get it to work the way I wanted but hey it is done right?

Hmm did you think I forgot? Did ya? NOPE! Blog candy! Here you go, three sets of metal Making Memories charms and a BNIP Inkadinkado alphabet stamp set. All you have to do is leave a comment to be entered, follow only if you want to. I will draw a name on Monday morning and post, the winner will have two days to get me their mailing address or I will pick a new one! Happy hopping!


23 June 2011

Get in shape!


Circles, squares, stars oh my! Today the challenge at Counterfeit Kit Blog is to use a shape and have it be the center of your layout. Well I could not pick just one shape, I picked two! Can you tell which ones? Yep, circles and brackets. What do you think?

I made the lollipop flowers and the centers are velvet brads. I did add the ribbon, and the letters that spell "training" but they were from past kits so it is OK! I tried a new "ribbon" technique, do you think it looks alright? I can't wait to see what shape you choose!

21 June 2011

Father's Day cards, may offend


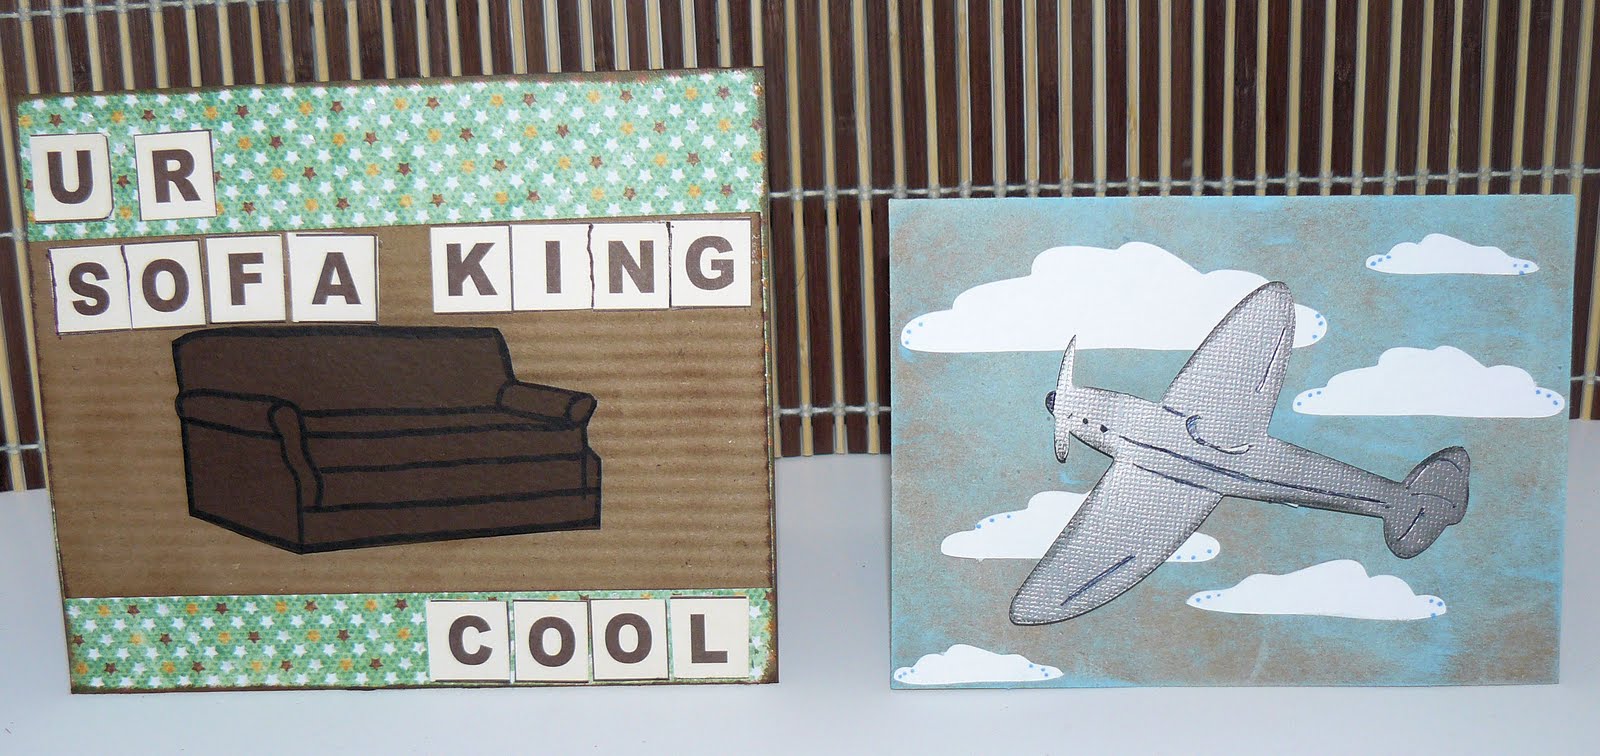
Here are the two cards I made for my Dad and my FIL. My Dad used to have a license plate with the "Sofa King" phrase on it. (Say it fast!), so that is his card and the one with the airplane is a simple one for my FIL since he is in pilot training now (recreational). I hope they liked them.

19 June 2011

Quick fast and cute-just my style!

Here is the last thing I made for my friend. It is a 5.5 by 4 inch notebook that my friend Jamie made me. I altered it with scraps from my June Counterfeit kit. I am so happy that I FINALLY use that beautiful lace/pearl trim! I think it was the perfect touch. The "R" and tiny letters are from my stash of other kits.

17 June 2011

It's a Girl-Scrapbookpal.com


Good morning. Today I have a special to me layout to share with you. Today (June 17th) we are celebrating my good friend's third baby girl with a baby sprinkling. A sprinkling is where we all get together to celebrate the new addition to be but instead of gifts of clothes etc we do consumables (diapers, wipes etc).

I made this page for all the guests to write their words for the new baby to be on the onesies. I will, of course, be taking pictures so when I get them edited and printed I will add them to the white spots.

This month Scrapbookpal.com sent the designers the awesome Viva Decor Pearl Pens and Scor-tape. Now me being a novice on anything not in big box stores, thought Scor Tape was like a foam tape but I was wrong. This stuff is strong, like gorilla strong! I used it all over this layout, to string the ribbon for the faux clothes lines, to adhere the bigger polka dotted ribbon towards the bottom and eventually will use it to permanently adhere the clothespins to the layout once the words are written. If you have not tried this tape I highly recommend it. You can find it here and with free shipping over 25.00 what are you waiting for?

You will need the following to make this quick and simple layout:
Cricut Expression
New Arrival cartridge
ATG and adhesive
Scor Tape 1/4 inch
Viva Decor Cream pearl pen
Chestnut roan ink pad
ribbon of your choosing
pattern paper
Brown, white, Kraft and pink card stock
polka dot stamp

Directions:
1. Make the following cuts in the colors indicated using the Cricut Expression and New Arrival cartridge:
8 Onesies in pink at 2.5 inches
Title: It's a girl at 3.5 inches in pink, Shadow same size in brown

2. Adhere shadow and title cut using ATG tape or other adhesive of your choice. Stamp the title and clothespins using chestnut roan ink and your choice of a polka dot stamp.

3. Ink all edges of the onesies with chestnut Roan Ink.

4. Using Kraft Card stock as your base, adhere the pattern paper strips (6X12) to the middle of both pages. Adhere polka dotted ribbon using score tape to the bottom of the pattern paper strips.

5. Cut, ink and adhere two 4X6 photo mats (actual size is 4.25 by 6.25).

6. Using scor tape adhere thin brown ribbon to make a faux clothesline; first clipping the stamped on clothes pins in place. DO NOT adhere the clips or onesies to the page until you get the guests to write down their thoughts.

7. Using the cream Viva Decor Pearl Pen accent the photo mats with pearls, and use for the center flower in the title "It's a Girl".

8. Using white paper, cut 1/4 or smaller strips, ink all edges. Use these as journaling spots beside each photo mat. Ink all edges of Kraft card stock. Enjoy!

Pink, Pearls, bling and butterflies!!!

Remember these from Michael's dollar bin? They are letter hooks. Well I altered this one to go with the tag and bottle cap sign. My friend loves pink, pearls, bling and shabby chic. I think I got it. I hope she likes it!

15 June 2011

Bottlecaps and Butterflies


I have a few (OK a LOT) of these awesome bottle caps from Maya Road in my stash and I decided to make one into a sign of sorts for a friend. To start I cut a circle on my circut that fits into the bottom of the cap. Glossy accents works wonders for this whole project by the way. It is hard to tell in this picture but I even used my Tim Holtz hammer thing (what is the correct term for it?) to detail the middle butterfly. Lots of paint, bling, glue, pleated ribbon, circles, ribbon, twine and a pearl topped stick pin and there you go! I hope she likes it! I loved the saying!